Infrastructure as Code

Lesson 1: What Is Infrastructure as Code?
(This is a fantastic 3 minute explanation of the value of Infrastructure as Code.)
Infrastructure as code (IaC) as the idea that, rather than manually provisioning servers, or setting up hardware through a point-and-click GUI, the "server room" should itself be managed by code. That code can then be put under version control, tested, deployed with automated build tools, and so on. The code also serves as necessarily up-to-date documentation of what the infrastructure is.
The advantages of IaC can be divided into three main categories:
- Cost savings: By automating hardware provisioning, the time of the people who would have been doing that by hand is freed up for other tasks.
- Speed of deployment: It is much faster to configure infrastructure by running a script than by manually setting a bunch of parameters in a GUI interface.
- Lower error rates: It is error-prone, because it is boring, too configure systems "by hand." A script can be debugged once, and then will run reliably again and again. Furthermore, as code, the infrastructure can be read and reasoned about. It is very hard to do that with a bunch of check-boxes!
(Source: Wikipedia on Infrastructure as Code )
A Software Engineering principle:
Asking people to behave like automatons
bores and dehumanizes
them. Asking them to devise clever ways
to automate things
interests them, and treats them as the rational
beings that they are!
Aristotle: humans are
rational animals.
Lesson 2: Available Tools
Puppet
Pros:
- Easy installation
- Supports all majors operating systems
- GUI is user friendly
- Stable and mature solution
Cons:
- New users must learn Puppet DSL (domain-specific language)
- Remote execution is challenging
Chef
Pros:
- Meant to be used by programmers
- Useful for large-scale development
- Stable and mature solution
- Good version control capabilities
Cons:
- Complicated tool to use
- Familiarity with Ruby is desirable.
- Documentation can be overwhelming
A sample Chef script that provisions a MySql server:
    service "mysql" do
      supports :restart => true
      action :enable
    end

    if ['solo', 'db_master', 'db_slave'].include? node[:instance_role]
      template "/etc/mysql.d/custom.cnf" do
        owner 'root'
        group 'root'
        source 'custom.cnf.erb'
        notifies :restart, resources(:service => 'mysql')
      end
    end
Ansible
Pros:
- Easy and fast deployment
- Secure SSH connection
- Meant for environments that can scale rapidly
- Push and pull models are supported
Cons:
- Basic support for Windows
- GUI is not very interactive
- Difficult to locate syntax errors with YAML
Sample Ansible playbook:
    - name: Install WordPress, MySQL, Nginx, and PHP-FPM
  hosts: all
  remote_user: root
  # remote_user: user
  # become: yes
  # become_method: sudo

  roles:
    - common
    - mysql
    - nginx
    - php-fpm
    - wordpress
Source: https://github.com/ansible/ansible-examples/ blob/master/wordpress-nginx/site.yml
SaltStack
Pros:
- Implemented in Python and controlled with YAML files which are simple to understand
- Fast communication between master and client
- Provides high scalability and resiliency
- Vibrant support community
Cons:
- Difficult to set up
- Salt GUI is under development
- Does not support a variety of Operating Systems
Lesson 3: What Is Docker?
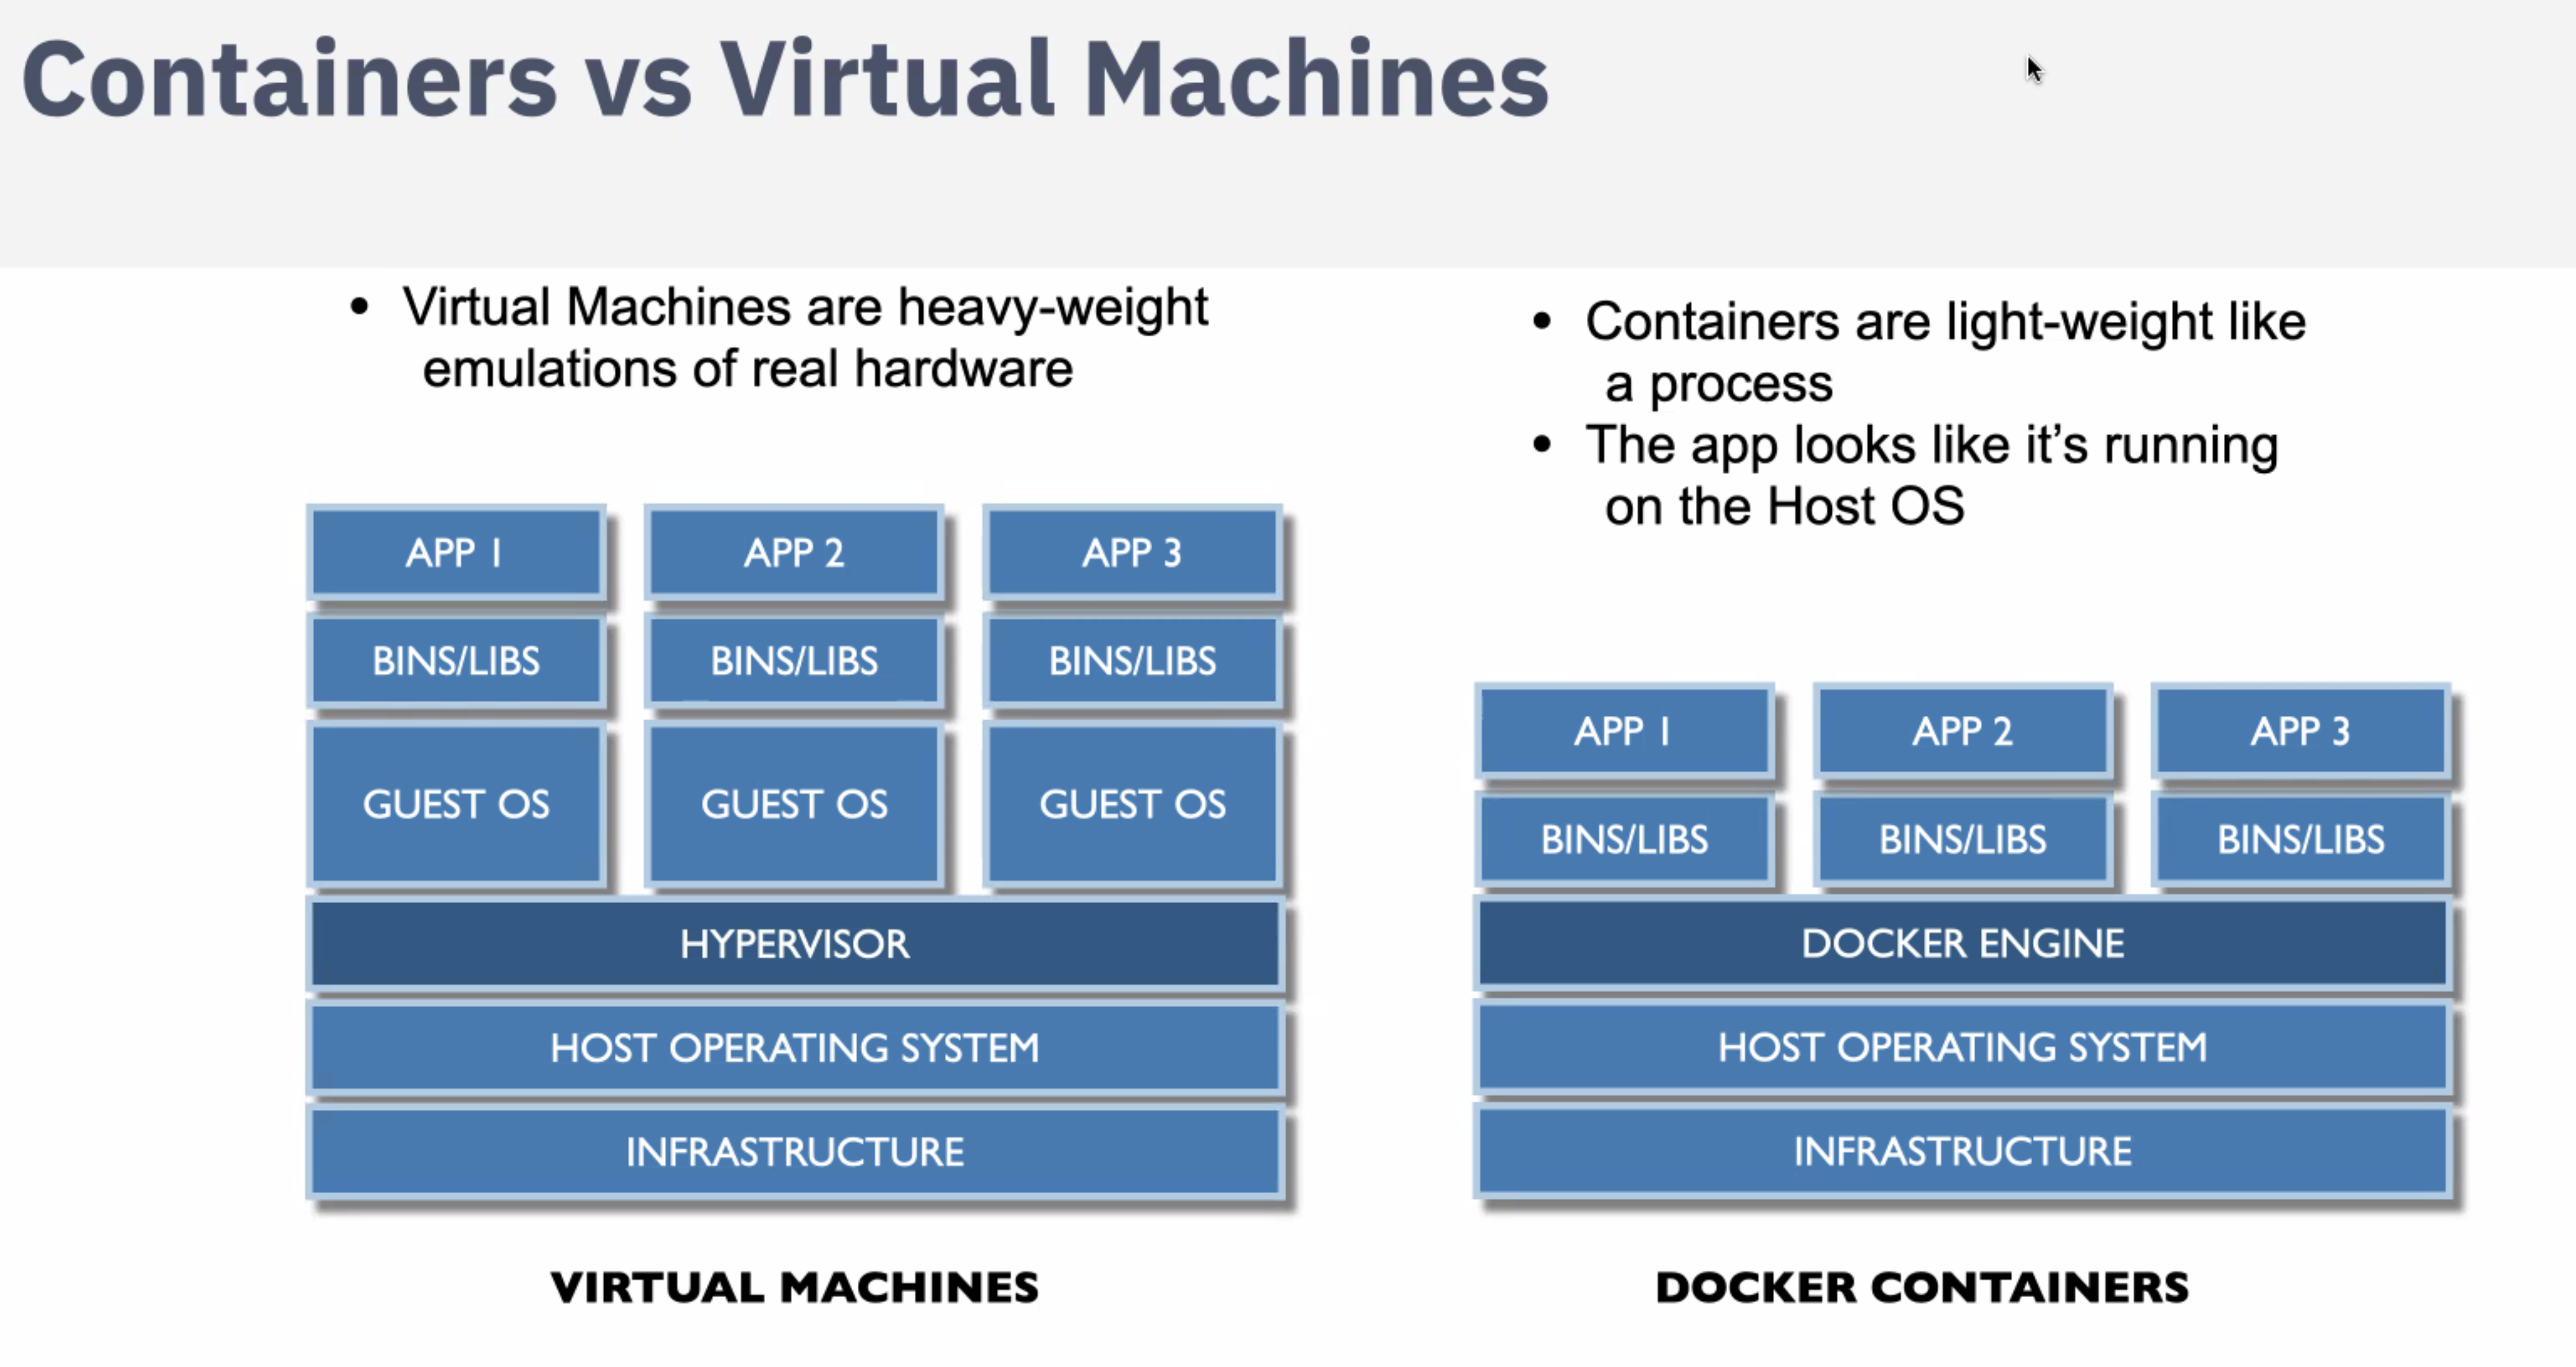
Before we look at how to run Docker, let's examine of few aspects of what Docker is. A very simple way to describe it, for those who know virtual machines, is that it is a light-weighter, somewhat-less-walled-off, virtual machine. But this is only a way to give you a rough idea of how to think about Docker: let's go deeper into the details and see what it really is.
The most important feature of Docker is its extremely fast load time: a container can start in under a second, while a virtual machine may take minutes to boot. Docker achieves this speed increase by building on top of virtualization aspects of the Linux kernel. And that is why it is not as fast, and more difficult to work with, on Mac or Windows boxes: it is actually running a Linux virtual machine, that then runs Docker. Ironically, this may mean that your container actually starts up much faster on a busy cloud service than it does on your otherwise idle laptop.
Here are the major technical capabilities upon which Docker relies:
-
cgroups
cgroups, short for "control groups," limit a process, and all of its children, to certain amounts of CPU, memory, and network bandwith, and particular namespaces and devices on the system. When we kick off a Docker container, it runs within a cgroup that limits what it can do. -
namespaces
Here, the Wikipedia article on Linux namespaces describes these as well as I could wish to, so:
"Namespaces are a feature of the Linux kernel that partitions kernel resources such that one set of processes sees one set of resources while another set of processes sees a different set of resources. The feature works by having the same name space for these resources in the various sets of processes, but those names referring to distinct resources. Examples of resource names that can exist in multiple spaces, so that the named resources are partitioned, are process IDs, hostnames, user IDs, file names, and some names associated with network access, and interprocess communication."
"Namespaces are a fundamental aspect of containers on Linux." (See source below.)
It is worth noting that Google Chrome uses namespaces as a security, not a virtualization, technique. -
libnetwork
This library enables separate network connections and IP addresses for processes running on the same machine, so that with docker compose we can run an entire distributed application on our laptops. -
Union File System
As Wikipedia has it, "In computer operating systems, union mounting is a way of combining multiple directories into one that appears to contain their combined contents."
UNIX and Linux filesystems are themselves files. To access them, they must be mounted at some point under the root directory. If we mount two directories at the same mount point, one after another, we will only find the contents of the second there. But if we union mount them, we will have the union of the two.
Union mounting is how Docker builds up your image from multiple layers of docker images. That means you don't have to start from scratch every time you want to make an image. And containers can share files until one of them writes to one, at which point that file will be moved from the read-only shared area to the read-write layer specific to that container. -
AppArmor
"AppArmor ("Application Armor") is a Linux kernel security module that allows the system administrator to restrict programs' capabilities with per-program profiles. Profiles can allow capabilities like network access, raw socket access, and the permission to read, write, or execute files on matching paths." -- Wikipedia -
libcontainer / runC
This C library (which appears under either name) executes programs in a chroot jail environment. This means that a program is "jailed" within the directory tree rooted in the directory in which the program was started. -
Netlink
"The Netlink socket family is a Linux kernel interface used for inter-process communication (IPC) between both the kernel and userspace processes, and between different userspace processes, in a way similar to the Unix domain sockets. Similarly to the Unix domain sockets, and unlike INET sockets, Netlink communication cannot traverse host boundaries." Wikipedia -
Netfilter
Netfilter is a framework provided by the Linux kernel that allows various networking-related operations to be implemented in the form of customized handlers. Netfilter offers various functions and operations for packet filtering, network address translation, and port translation, which provide the functionality required for directing packets through a network and prohibiting packets from reaching sensitive locations within a network. Wikipedia
Sources:
Docker: What's Under the Hood?
Linux Namespaces
Introduction to Control Groups
Union mount from Wikipedia
Docker and Union File System
Lesson 4: Running Docker
First thing: Make sure you have Docker installed! You won't get any further in following along on your laptop if you do not.
Secondly:
Please clone (if you have not already) our online DevOps
repo:
git clone https://github.com/gcallah/OnlineDevops.git
Once you have cloned that repo, please open two shells: in one, we will look at your local environment, and in the other we will explore the container.
In one of the two shells, in your OnlineDevops directory,
please run:
./container.sh
That should put you inside the OnlineDevops container: if
that command worked, you should see your prompt change.
If it did, let's explore the shells you are in a little to
try to understand better what a container is.
I am going to proceed by showing you the results of running
the same command inside and outside the container on my
machine: your results will be different, but similar, to
mine.
First of all, let's look at the root file system, inside and outside the container:
Outside the container:
ls /
    Macintosh:OnlineDevops gcallah$ ls /
    Applications            bin                net
    Library                cores                opt
    Network                debug.txt            private
    Shockwave Log            debug.txt.1            sbin
    System                dev                tmp
    User Guides And Information    etc                usr
    User Information        home                var
    Users                installer.failurerequests
    Volumes                logFile.xsl
Inside the container:
ls /
    root@a5dd222a9812:/home/DevOps# ls /
    bin   dev  home  lib64    mnt  proc           root  sbin  sys    usr
    boot  etc  lib     media    opt  requirements.txt  run   srv   tmp    var
What's of note here: From outside and from inside the container, we see completely different file systems! Inside the container, we are in a chroot file system.
What about our view of what processes are running?
Outside the container we see:
ps -ef | wc -l
     Macintosh:OnlineDevops gcallah$ ps -ef | wc -l
     667
From outside the container, the OS lists 667 processes as running on my Mac.
Inside the container we see:
ps -ef
    root@a5dd222a9812:/home/DevOps# ps -ef
    UID        PID  PPID  C STIME TTY          TIME CMD
    root         1     0  0 Oct25 pts/0    00:00:00 bash
    root       192     1  0 21:18 pts/0    00:00:00 ps -ef
From inside the container, there are two processes running! The container has process isolation from the host. It has its own process namespace separate from its host's namespace and from the namespace of any other containers running on that host. The separate namespace also provides the container with its own hostname, its own user IDs, and its own inter-process communication names.
Some Docker commands
Now let's look at what some Docker commands are available, and what they do.
docker ps
This will list your currently running Docker images. When
Prof. Callahan runs it while preparing this lecture, he
sees:
    Macintosh:OnlineDevops gcallah$ docker ps
    CONTAINER ID        IMAGE               COMMAND             CREATED             STATUS              PORTS                     NAMES
    429ff1a37d21        devops              "bash"              11 seconds ago
    Up 6 seconds        0.0.0.0:32768->8000/tcp   stupefied_swanson
(The 0.0.0.0 is the IP address to use for the container, and 32768 is the port it is using.)
docker ps -a
This will list all images that have been run
on the system, not just those that are active:
    Macintosh:OnlineDevops gcallah$ docker ps -a
    CONTAINER ID        IMAGE               COMMAND             CREATED             STATUS                           PORTS                    NAMES
    c560c3729d7e        devops              "bash"              18 minutes ago
    Up 18 minutes                    0.0.0.0:8000->8000/tcp   brave_kirch
    429ff1a37d21        devops              "bash"              About an hour ago   Exited (130) 44 minutes ago                               stupefied_swanson
    32b272487675        devops              "bash"              5 days ago          Created                                                   wonderful_heyrovsky
    a5dd222a9812        devops              "bash"              10 days ago         Exited (130) About an hour ago                            naughty_beaver
    e82e4fb65823        devops              "bash"              11 days ago         Exited (130) 11 days ago                                  youthful_noyce
    0433f774c394        devops              "bash"              11 days ago         Created                                                   stupefied_hawking
    1ba39e023554        devops              "bash"              11 days ago         Created                                                   practical_ptolemy
    4a6bc8cf7ab0        devops              "bash"              11 days ago         Created                                                   vigilant_curie
    47cb14ca5b1b        devops              "bash"              2 weeks ago
    Exited (255) 11 days ago         0.0.0.0:8000->8000/tcp   determined_goldwasser
    7af5f14f88d9        f418f33054e8        "bash"              2 weeks ago         Exited (130) 2 weeks ago                                  modest_hypatia
    e3292cdc1449        indra               "bash"              2 weeks ago         Exited (130) 2 weeks ago                                  competent_hugle
    3ad630752ebf        indra               "bash"              2 weeks ago         Exited (130) 2 weeks ago                                  amazing_meitner
    fe439d8e15c2        indra               "bash"              2 weeks ago         Exited (130) 2 weeks a
docker images
This command should give you the list of images
that are available on the system. For example
in Prashant's system it looks something like
this:
    ENG-EJC369-02:$ docker images
    REPOSITORY            TAG                 IMAGE ID            CREATED             SIZE
    gcallah/jenkins_py3   latest              21130e104ca1        4 weeks ago         742MB
    jenkins               latest              cd14cecfdb3a        6 weeks ago         696MB
    gcallah/indra         v7                  ad9670e8b27f        2 months ago        946MB
    python                latest              efb6baa1169f        5 months ago        691MB
    ubuntu                latest              f975c5035748        5 months ago        112MB
    gcallah/emu86         v4                  f6833ae8bf9e        6 months ago        776MB
    gcallah/django        latest              432de70e222d        6 months ago        769MB
    bash                  latest              59507b30b48a        6 months ago        12.2MB
    alpine                latest              3fd9065eaf02        7 months ago        4.15MB
In the above listing, the nginx image
is not installed. Running the following command will
pull the nginx image from DockerHub, which is like GitHub,
but for docker images.
docker pull nginx
Now that you have installed the nginx image,
just run the docker images command again,
in the list you should see ngnix image as below:
    ENG-EJC369-02:$ docker images
    REPOSITORY            TAG                 IMAGE ID            CREATED             SIZE
    nginx                 latest              71c43202b8ac        7 hours ago         109MB
    gcallah/jenkins_py3   latest              21130e104ca1        4 weeks ago         742MB
    jenkins               latest              cd14cecfdb3a        6 weeks ago         696MB
    gcallah/indra         v7                  ad9670e8b27f        2 months ago        946MB
    python                latest              efb6baa1169f        5 months ago        691MB
    ubuntu                latest              f975c5035748        5 months ago        112MB
    gcallah/emu86         v4                  f6833ae8bf9e        6 months ago        776MB
    gcallah/django        latest              432de70e222d        6 months ago        769MB
    bash                  latest              59507b30b48a        6 months ago        12.2MB
    alpine                latest              3fd9065eaf02        7 months ago        4.15MB
(You can put an image into DockerHub using
docker push.)
Download website code
Ok now that you have download the nginx image, let's download the static website that you are going to host inside the docker container. We are going to use the algorithms website for another course. You can find the code for the website here.
Please remember the location where you have
cloned the repository. Prashant has cloned it in
/Users/prashant/school/algorithms.
Your location will be different than this, please note
the location.
Let's make a container
Ok, so we have downloaded the nginx image and the code of the website which we want to host. All we need to do is just make a container out of the image. We will put the code of website inside the container so that the web server which is nginx in our case can read the html files and host it in a local server. The command for that is as shown below.
                        docker run --name algo_website -p 127.0.0.1:8080:80
                        -v
                        /Users/prashant/school/algos/:/usr/share/nginx/html
                        -d nginx
Please don't forget to change the location of
algorithms directory in above command.
After you run the command open the browser
and type http://localhost:8080
and you should be able to see the webpage.
Windows user should use the address
http://0.0.0.0:8080
instead of localhost.
After we leave the container, we can get rid of it using
docker rm algo_website.
If we need to remove a container that is still running,
we will have to stop it first with
docker stop.
Our Docker Implementation
We use Docker in our projects for two main reasons, with a third to come:
- To set up a local version of a web server that will be configured "just like" our production server. ("Just like" is in quotes because that is always the ideal, but it may not be fully achieved.)
- To provide our full suite of development tools, such as the correct Python version, make, flake8, various Python libraries, etc., in one simple to build package, so all developer's have a consistent environment.
- Ultimately, we should be deploying the container where we locally test our web servers right into production, guaranteeing that development and production are identical environments. Unfortunately, at the moment, the places we are hosting do not support that. We are exploring other options.
So we need to know how to create the right container for
each project.
Each project we work on should have a
Dockerfile consisting of instructions
on how to build the image for that project, a
requirements.txt listing what
external modules need to be included in the image,
and a line in the project's makefile
automating the build of the image.
This is infrastructure as code, since the infrastructure for
the project is built from these files of code.
(For development containers, we also should have a file
called requirements-dev.txt.)
So, in the makefile we want something
like:
        container: $(DOCKER_DIR)/Dockerfile  $(DOCKER_DIR)/requirements.txt


                    docker build -t indra docker
-
Here is a sample Dockerfile.
TheFROM python:3.6.0command says what base image to build our image from.
TheCOPY requirements.txt /requirements.txtline brings the requirements file inside the container.
The lineRUN pip install -r requirements.txtinstalls everything from the requirements file in the container.
The lineENV user_type TERMINALsets an environment variable (user_type) that will be available inside the container.
WORKDIR /home/IndrasNet/sets the starting directory inside the container. - Here is the requirements file it uses.
Our More Advanced Docker Usage
In the Online DevOps course project, we use a more advanced Docker setup: we employ Docker Compose to define and run an application composed of more than one Docker container.
Docker Compose use a YAML file to specify the configuration of a multi-container Docker app.
In the Online DevOps course setup, we are running just two
containers: one to run the MySQL database, and the other
to run our Django web server. But other Docker Compose
setups might include a web server, a load balancer,
a database, an authentication server, and more!
Here
is the YAML file that specifies our two-container
application.