Incremental Development
"Deliver software frequently..." -- The Agile Manifesto
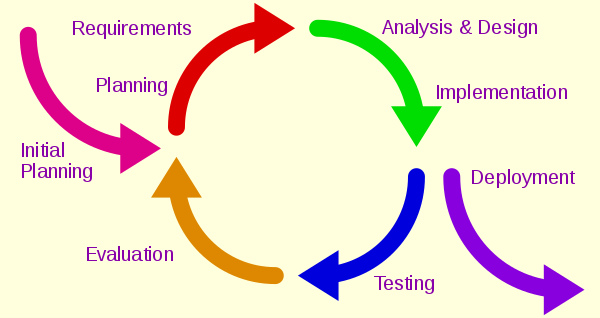
Lesson 1: Why incremental?
Why do incremental development?
- Small batches of work make testing easier.
- Small batches make it easier to find a bug when you have one.
- Small batches enable rapid feedback from the users on whether the software is delivering what they want.
- Small batches allow us to deliver value to the user more rapidly.
- Small batches are more satisfying to the developers, because they get to see their software being used soon after they write it.
Completing and delivering small batches of work at a time is such an important part of Software Engineering that we could almost say that every other part of Software Engineering exists to enable frequent, reliable delivery of small improvements to a piece of software.
In older models of software development, it was thought that rapid delivery of software to users meant buggy systems that crashed a lot. But studies have repeatedly shown that small, frequent releases mean more reliable software. [INSERT STUDY HERE.]
To complete this section, please read Iterative and incremental development
Lesson 2: Version control everything
Version control is the name for tools that allow
the storing of different versions of project files, and the
ability to revert to an earlier version (for instance, when a
bug is found in the new version).
There are a variety of version control systems in existence,
such as RCS, SCCS,
Suberversion, CVS,
and git.
You should study the page on version control
here.
Please read:
Version control everything
A major question that arises in using version control is how to use branches, or separated development streams. Please read this paper to understand the issues involved.
Lesson 3: git and GitHub
git.
First things first: don't confuse git with GitHub!
git is a system for creating and updating a
distributed source code control repository. It includes features for adding
new files, updating files, deleting files or versions from the
repository, branching, resolving version conflicts, and reverting
to earlier versions.
GitHub, on the other hand, is a web site that allows for free
storage of public repositories ("repos" for short).
It is not necessary to use GitHub in order to use
git: some companies have a "origin" repo they keep
internally, while other people use other public sites, such as
BitBucket,
to hold the origin version of their repo. (We, in fact, will
explore moving to BitBucket during our course.)
Basic git
You will only need a small number of git commands
for most of our work.
(You can also use git from
GitHub Desktop, but it is good to be at least a little
familiar with command line usage.)
In particular, you need to know:
-
git clone
                        https://github.com/gcallah/OnlineDevops.git
This makes a local copy of a repo from an online copy. The online copy becomes the origin repo for the local copy. -
git add <filename>
Adds <filename> to the repo. -
git commit <filename> -m "Message"
Commits changes to <filename> into the repo, labeled with "Message".
Note: Commit messages are important! They let your teammates know why a new version of the file has been created. -
git push origin master
This pushes the master branch of your code to the origin repo. (Some projects create multiple branches: following the guidelines for continuous delivery, we will not be doing that.) You run this when you are ready to share your work with your team: that should happen frequently! Several pushes per hour is not unusual. -
git pull origin master
This is how you refresh your local repo with the work others have been doing. You should certainly do this to start your work day, and if you know others are working at the same time, perhaps more often. -
git rm <filename>
This removes <filename> from the repo and your local file system. You should always delete files throughgitand not using your native OS's capabilities. -
git mv <old_filename>
                        <new_filename>
This renames <old_filename> to <new_filename>. You should always rename files throughgitand not using your native OS's capabilities. -
git status
This shows you the current state of your repo. -
git branch <branchname>
This will create a new branch with <branchname>. As mentioned above, our projects generally discourage branching as an anti-CI pattern. -
git checkout <branchname>
This will set your working branch to <branchname>. -
git merge <branchname>
This will merge <branchname> into the current branch. Therefore, usegit statusto make sure you are on the branch into which you want to merge before you do the merge.
Some files to know about:
-
.gitis the actual repository: the other files you see are working copies of the latest version in the repo. -
.gitignorelist the various types of files you don't want in the repo.
A sample git ignore file.
git is a distributed version control
system. This is important to understand for a couple of
reasons:
-
Using
gitone can work entirely offline, and continue checking code into the repo: each person who has cloned the repo has a full copy of it. Whenever you get back online, you can re-sync. -
Understanding many of the problems one will hit while
using
gitis easier knowing this: typically, problems arise when to copies of the repo get out of sync, andgithas trouble re-syncing them.
Resolving conflicts
So what to do if your copy of the repo is out of date with the origin copy? Here are some things to look at:
-
Sometimes, the problem is simply that you haven't done
a
git pullrecently enough: try the pull command above, and see if that clears up your problem. -
But maybe you and someone else have actually been working
on the same file at the same time?
gitdoes a pretty good job of trying to resolve this: if you have obviously been working on different parts of the file,gitcan often merge your changes correctly, without human intervention. But ifgitcan't do this, it will produce a marked-up file for you to merge by hand. The file will contain lines like:<<<<< HEAD:file.txt Hello world ======= Goodbye >>>>> 77976da35a11db4580b80ae27e8d65caf5208086:file.txt
Your job then is to choose whether you want "Hello world" or "Goodbye" in the file, and delete the one you don't want, as well as deleting those weird linesgitadded. -
Finally, you may have a situation where you realize
you were just "messing around" and don't want to retain any
of what you wrote. (In that case, a branch would have
been useful!) You can sometimes fix that up by letting
gitknow you want it to ignore your work:
git checkout --theirs <filename>
git add <filename>
After that, you can perform a commit and a push as above. This will causegitto ignore your changes and just use "theirs": the one's in the origin repo.
On the other hand, sometimes you want your own version to be used rather than the version from "their" repo; then you can use--oursrather than--theirs:
git checkout --ours <filename>
Submodules
The final aspect of git we will discuss
here is submodules. They are a method of incorporating
one repo within another one. A good example of the use
of a submodule is our utils repo: it contains
various programs that are useful in multiple projects.
We don't want to have different copies of these programs:
that violates DRY!
So what we do is to share that repo among several repos
by including it as a submodule.
Submodules are useful, but git's implementation
of them is... tricky. First of all, a repo's submodules do not
update automatically! This is sensible, because the submodule
might be someone else's code, and you don't want a new version
to break your program. So you have to cd
to the submodule directory, and do a pull there to update it.
First, let's add a submodule: we will add
the utils repo we use in all of our projects as
a submodule in our practice repo. The first thing to do
is to add it:
git submodule add https://github.com/gcallah/utils.git
(The presenter will do this step for the class, since we can
only add a submodule once per repo!)
This will create a new file called .gitmodules
and a new dir called utils.
These store the information about
the submodule we have added in the repo.
utils will store the information on where the
files in this submodule come from.
Now we need to see how to clone a repo that has a submodule
and make things work properly. After you clone a repo with a
submodule, you will see that you have a directory for the
submodule, but that it is empty. You need to do two more steps:
git submodule init
will initialize your local configuration files to "know"
about the submodule. And:
git submodule update
Will fill the submodule directory with the proper files.
From that point on, it is important to note that the submodule will not update automatically when you do a pull. Given that the submodule might be third party software, we don't want a new version that might break our code automatically joining our repo! Thus, when you need the new version of a submodule in a repo, you have to explicitly run an update. We are working to automatically include such an update in our build files, where appropriate.
Submodules sometimes get so seriously out of sync with the origin repo of the submodule that the only solution is to delete the submodule and re-add it. That process is described here. (After deleting it, you simply re-add it with the normal steps.)
The following video contains excellent explanations of git internals: